

Mailing Lists in Messenger Pro
Adding email lists (or ‘mailing lists’) to Messenger Pro can seem daunting: there can sometimes appear to be a lot of steps to go through in order to make everything work as intended. In fact, there are only three stages required:
- Create a new folder to take the mailing list’s messages,
- Tell Messenger that the folder contains a mailing list (and where to send new posts), and
- Set up a filter so that incoming messages end up in the correct place.
Using Messenger’s mailing lists has a number of advantages over just sticking the messages into a normal email folder: it keeps the messages in one place and saves remembering the email address needed to post to the list. In addition, it allows Messenger to treat the folder as if it were a newsgroup, making the operation of the toolbar icons much more intuitive for group discussions.
In reality, the process is often quicker to do than to describe. Here we’ll look at adding a mailing list to handle the ArtWorks support list, which is hosted on FreeLists; exactly the same steps can be used for any list, just by changing the specific details as required.
Create a folder
The first step is to give Messenger a folder to store the messages which arrive from the mailing list. If you already have a folder containing messages from the list, this can be used – just skip to the next section and use your folder where instructed.
This folder should be created in exactly the same way as any other: open the Main groups window (with a Select-click on Messenger’s iconbar icon), and click on the New folder button in the toolbar.
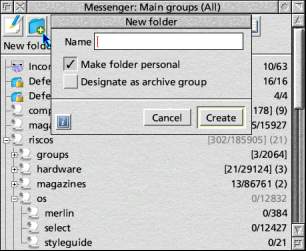
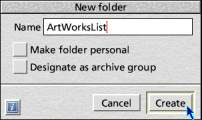
The Name of the folder doesn’t really matter, as it will ‘disappear’ once the mailing list is created in the next step. Since we’re creating a list for ArtWorks, we will give it the name ‘ArtWorksList’. Untick both Make folder personal and Designate as archive group, then click on Create.
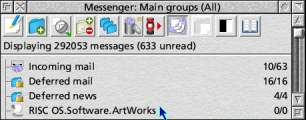
Depending upon your group list settings, the folder may not appear in the window as it will contain no unread messages. Set the list to show ‘All’ groups (Display – All groups from the menu), and it should appear as a normal folder somewhere in your Main groups list as shown here.
Make a mailing list
The next step is to tell Messenger that the ArtWorksList folder is to be used as a mailing list. From the iconbar menu, select Choices... and click on Mailing lists to open a window listing all of the lists defined on your system (if this is your first list, the window will be empty to start with).

Click on Add... to open the Edit mailing list dialogue ready to create a new list.
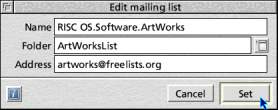
The Name is the name under which the list will appear in the Main groups list: as with any other group, adding full-stops will cause it to become part of a tree. If we call it ‘RISC OS.Software.ArtWorks’, it will appear with the name ‘ArtWorks’ as part of the ‘Software’ section of an overall ‘RISC OS’ heading.
The Folder field takes the folder created in the previous stage. Either type the name in, or click on the pop-up menu icon and select it from the list.
Finally, Address gives the email address used to post to the list – this would have been supplied when joining the list. Once entered, click on Set and the entry should appear in the list of mailing lists.
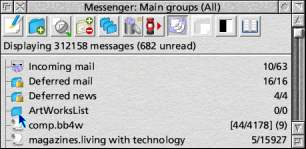
Going back to the Main groups list should show that the ArtWorksList folder has gone: in its place is the ‘RISC OS.Software.ArtWorks’ mailing list.
Add a filter
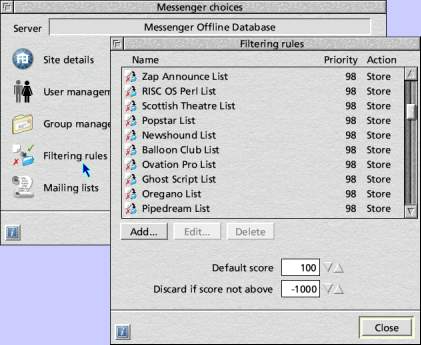
The final stage of the process is to create a filter to direct messages from the list into the list folder automatically. Return to the Messenger choices window (Choices... from the iconbar menu) and click on Filtering rules to open the Filtering rules dialogue. As with the Mailing lists dialogue, this may be empty if no filters have been defined.
Click on Add... to open the Edit filter dialogue for our new filter.
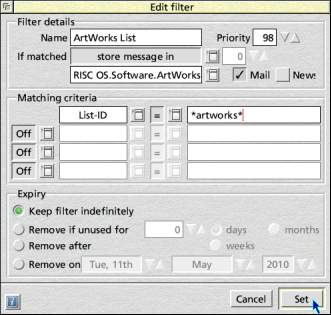
The Name of the filter isn’t critical, but it makes sense to be descriptive: ‘ArtWorks List’ should be clear. Ensure that If matched is set to ‘store message in’, then in the field below enter the name of the mailing list from the previous stage (or select it from the pop-up menu to the right).
The Priority determines what order filters are acted on: big numbers get checked first. Mailing lists are generally best filtered early, so pick a high number – if you have your own system then work with that, otherwise start with something near 100 to give room to manoeuvre either side (here we’ve gone for 98 so that 100 can be used for filters that really need to happen first).
Tick Mail, and untick News as this filter will only need to process incoming emails.
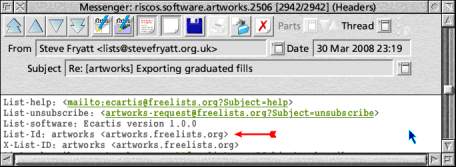
To set the Matching criteria, find an existing email from the list, open it and show the headers by selecting Display – Header from the message window menu. Most list software these days inserts a header into the email identifying the list: common ones are ‘List-ID’ and ‘Mailing-List’ (sometimes with an ‘X-’ in front of the name). Checking a header from the ArtWorks list reveals that this offers both List-Id and X-List-ID as shown here.
In the first row of the criteria, enter ‘List-ID’ in the left-hand box (it appears in, and can be selected from, the pop-up menu to the right), and set the logic field in the centre to ‘=’. In the header, we can see that the field starts with the word ‘artworks’, so enter ‘*artworks*’ on the right (the asterisk wildcards tell Messenger to ignore what else is on the line to either side of ‘artworks’).
Finally, under Expiry, select Keep filter indefinitely. With everything filled in, click on Set and the filter should appear in the list of filters.
Using the mailing list
That’s all that is required to get a mailing list working in Messenger. Incoming email from the list should now be filtered into the list folder and appear in the correct place: existing emails stored elsewhere can be copied in to the folder in the usual way. When reading messages and contributing to the group, using New message to group and Reply to group will now send a message to the list without having to remember the correct address to use.
By turning on threading in the list’s message view (Display – Threads from the list view window’s menu), the list can be made to look even more like a newsgroup.