Meeting: Using ArtWorks 2 – Part 2
Richard Ashbery returned for a second look at the very capable vector graphics package, ArtWorks 2 – this time focussing on tessellating patterns. Having explained the principles involved, he talked us through a complete design from a blank canvas to a brightly-coloured mosaic – in the process covering many handy tools, tips and tricks which will be of use to those who work with ArtWorks on even a casual basis.
Report by Steve Fryatt
July’s meeting saw the return of Richard Ashbery, following his successful talk on the use of ArtWorks 2 last year. This time around, the subject was to be tessellation, and Richard started by giving some examples of the artform’s history – including Roman mosaics and drawings by M. C. Esher. Examples of the latter’s work can be found at www.mcescher.com.
Creating a grid
With the examples out of the way, Richard loaded up ArtWorks and started on a new design. The important thing with tessellations is to start with a regular grid, so the first job was to create one by drawing thin horizontal and vertical lines at 4cm intervals on the page using the page grid lock to ensure accurate placement. Richard recommended putting these lines on their own layer, so that they could be kept separate from the rest of the design; in fact, since they were not to form part of the final design, one of ArtWorks’ background layers would probably be ideal.
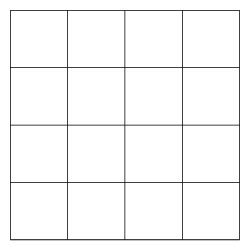
The basic grid, drawn at 4cm intervals
The next step of the design process was to vary the regular grid to make different shapes between the lines: simple squares would not produce an interesting design. By making the changes in a regular, repeating way, the impression of tiles would be retained.
The simplest variation is to place sine waves along the grid lines. Although these can be drawn by hand, Richard said that he found it easier to create them automatically using Rosemary Miskin’s DrawLots utility. By setting the width and repeats correctly in the utility, a wave could quickly be imported that exactly matched the grid in ArtWorks. Using the ‘pull to grid’ facility (Ctrl-P) aligned the wave with the existing boxes, and the clone tool (Ctrl-K) allowed multiple copies to be made and shifted into position on each of the horizontal lines.
The waves were drawn on to a second layer (again, a background layer would be ideal), allowing them to be handled easily without affecting the original grid lines. Once five horizontal waves had been cloned, Richard selected them all, cloned them as a group and then used the rotate tool to spin the copies accurately through 90°. With a couple of quick steps, we now had a set of more interesting tiles on top of the original square grid as shown below.
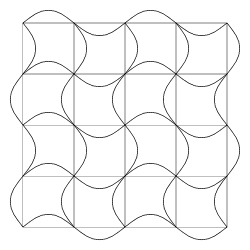
Adding a series of sine waves quickly produces a more interesting pattern
One variation to the design that is easy to carry out is to change the sine waves so that adjacent ones are ‘out of phase’. This was quickly achieved by selecting the second and fourth horizontal waves and mirroring them on the Y axis using the mirror-Y button hidden in the scale tool. Doing the same again to the vertical waves using the mirror-X button produced a totally different effect – nicely demonstrating the endless possibilities available with tessellations.
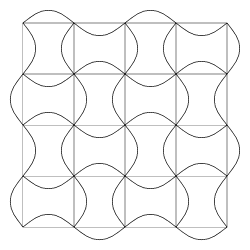
By making alternate waves run ‘out of phase’ a totally different set of tiles is produced
Designing the tile
Richard now returned to the original sine wave grid (ArtWorks’ undo facility showing its worth) and set about creating a single tile. At present the design was simply a set of unconnected lines, and it was necessary to create a closed shape around a single tile before it could be filled and used. Although there are many ways that this could be done, Richard went for the relatively ‘simple’ option of starting another new layer and tracing around the design.
The first step was to draw a curve, placing a point at each of the grid ‘corners’ and at each of the intermediate wave ‘peaks’ – all places where the sine waves landed exactly on points of the original page grid. By default, ArtWorks made all the joins ‘smooth’, so it was necessary to change those on the ‘corners’ into ‘sharp’ joins. Then, turning grid lock off for a moment, Richard tweaked each bezier control point so that the new shape followed the original lines as closely as possible.
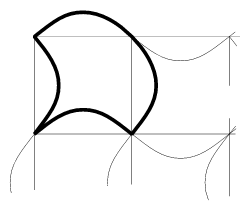
A single tile was created by tracing over the underlying grid. Being a ‘closed shape’, the tile could be filled and otherwise decorated
Completing the design
With the basic outline of the shape complete, Richard gave it a thicker, coloured border so that it stood out and filled it using ArtWorks’ graduated fill tool. The addition of a stylised eye symbol – prepared earlier and imported into the file – finished off the tile design. The whole thing could now be selected and grouped, producing the basic building block for the remainder of the illustration.
Making sure that the page grid lock had been turned back on again, Richard now cloned the tile design and rotated it 90° clockwise, before sliding it right so that it overlapped the adjacent spot in the grid. This gave two adjacent tiles, which he now selected together, cloned, rotated through 180° and moved down to the row beneath. This gave a group of four tiles which, due to the use of grid lock, all aligned perfectly. Cloning the group and moving it right revealed the top two rows of the design.
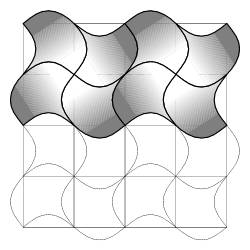
The single filled tile can be cloned and moved around to create an interlocking pattern
Creating the remainder of the pattern was done by further grouping, cloning and moving of groups of tiles. Richard showed that, even now, it was possible to vary the appearance of the design by mirroring and rotating lines of tiles, before shuffling them into place. With each rearrangement, new and different patterns emerged from the page.
Finally, with the ArtWorks page filled with tiles, Richard tidied things up and created a neat rectangular graphic without the jagged tiled edges. First, he drew an unfilled rectangle around the area of the page that he wished to use for the finished image – taking time to get the symmetry of the pattern correct. He then gave the rectangle’s border a small width and coloured it black, before putting it to the back (Ctrl-B), selecting both it and all the tiles, and creating a clip-view from the lot (Shift-Ctrl-C). The finished result can be seen below.
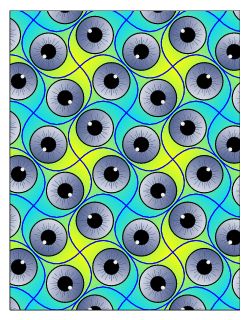
Once again, Richard managed to make some fairly complex techniques appear effortless, and showed what can be achieved using a tool such as ArtWorks. Many of the ideas could be transferred to other packages, such as Draw or Vector – or even Xara or InkScape on other platforms – with a little care. I certainly left the meeting with several new tricks to experiment with and, judging from the questions and discussions at the end, I suspect that many other audience members did too.
More details
Rosemary Miskin’s DrawLots is freeware, and copies can be found alongside many other useful utilities on her website at: miskin.orpheusweb.co.uk.
More of Richard’s ArtWorks artistry can be found on his website: homepages.nildram.co.uk/~riscos.


