

How to Select and Set IP Addresses
Article by Steve Fryatt
In the previous howto in this series, we started by looking at the basic structure of a network and at the addresses which are used to identify the different machines connected to it. It’s all very well knowing what the addresses mean, however, but when setting up a network for real it’s also necessary to know what addresses to use and how to let the hardware know what they are.
This article is one of the twelve that form The WROCC Guide to Networking, which is available to purchase from the Club in A5 printed or PDF form.
Private networks
All the network devices that you buy will already have MAC addresses set inside them: as we saw in the previous howto, these are allocated by the IEEE via the manufacturers, and uniquely identify each and every piece of networkable hardware in existence. Therefore, when putting your network together, all that’s left is to decide what IP addresses to use.
Like MAC addresses, IP addresses are allocated by a central body: in this case the IANA. Fortunately, there are three blocks of addresses allocated for ‘private networks’ which are free to be used without registration, so long as they do not appear on the internet at large. For anyone setting up a stand-alone network (with no internet connection at all) or an internet connection using a router which performs Network Address Translation (which is basically any dialup or broadband internet connection), these are the ones to use.
There are two blocks of addresses in common usage: those starting with 10 (10.x.x.x) and those starting with 192.168 (192.168.x.x). There is also a third block, in the range 172.16.x.x through to 172.31.x.x – these seem to be a lot less common, and you may have to search hard to find anyone using them. Home networks will generally be using a subnet mask of 255.255.255.0, meaning that the first three numbers of the address will give the network number and therefore be the same on all machines – so how do we go about choosing a network number?
Look at your hardware
If you have a broadband router, the best strategy for deciding on a network number is to find the address that it defaults to on the local network, and take the same one. So if your router defaults to 192.168.0.1 (as many Netgear devices do, for example), then use 192.168.0.x as your network; if it defaults to 10.1.0.100, then use 10.1.0.x as your network. This means that should your router require resetting for whatever reason, it will still be accessible to any computers on your network which have a fixed IP address set (we’ll come back to this later).
If you share an internet connection from a Windows machine using Windows’ Internet Connection Sharing, then this always uses an address of 192.168.0.1 for its connection on to the local network. Since this can not be changed, you must use a network of 192.168.0.x when accessing the internet via Windows ICS.
If you don’t have a broadband router, then you’re free to choose whatever network number you wish. However, it’s probably wise to stick with one of the common ones: 192.168.0.x or 10.1.0.x. If you ever expect to use a Windows machine on the network, then 192.168.0.x is probably a wise choice to give compatibility with ICS in the future.
As for the subnet mask, stick with 255.255.255.0 and limit yourself to 254 devices on the network. Enough software defaults to assuming this setting that trying to change it is more hassle than it’s worth.
Address allocation
Having decided on a network number, the next step is to decide what addresses to give each device and then to configure each one. There are two ways to do this: manually, or automatically. Manual configuration is tedious, but it does give you overall control and some devices require it. Automatic configuration is much less effort, but it can have limitations and not all versions of RISC OS support it.
To configure a network manually, it’s simply necessary to decide how to allocate machine numbers to the different devices, and then to configure each machine in turn – remembering not to use either of the special machine numbers mentioned last month. If you’re methodical and keep a written record of what you have done, the process isn’t too hard.
Alternatively, the most common method of automatic address configuration is a system called the Dynamic Host Configuration Protocol, or DHCP for short. A single device on your network acts as the ‘DHCP server’, and when they connect, other devices contact it and ask for an IP address to use. Most broadband routers offer this facility, as does Windows ICS.
Using DHCP has many advantages. For portable computers such as laptops it means that the computer can pick up an address for any network it is connected to without manually changing its configuration: it’s safe to assume that any ‘public’ network, such as WiFi hotspots, will have DHCP available. For other devices, such as networked printers, which can only be configured over the network, it gets around the chicken and egg problem of how to set the IP address if you can’t get to the configuration tools before the IP address is set.
Pick and mix
There are two perceived problems with DHCP. The first is that older versions of RISC OS don’t support it. It’s in RISC OS 5 and Six, and it was added to RISC OS 4 in the second Select release, but users of versions prior to this can only set their IP addresses manually (or via an AUN system which isn’t much use when accessing the internet).
The second problem is that for devices which need to be accessed across the network (such as printers, network-attached storage, or even computers acting as different types of server), it is desirable for them to keep the same IP address every time they are switched on. Often the addresses of devices such as printers get stored in numerous places (such as the Printers configuration on RISC OS), so updating these should the DHCP give them a different address could quickly become a nuisance.
Fortunately, in most cases, it’s possible to have both DHCP and manually configured addresses on the same network. Routers can be told to allocate (‘lease’ in the DHCP jargon) addresses from a limited range, so if this is configured as (say) 192.168.0.100 to 192.168.0.254 then it’s also possible to give other devices fixed addresses so long as they fall in the range 192.168.0.1 to 192.168.0.99.
The other trick, which some routers support, is to tell them to always give the same address to a particular device – as explained last month, this is done by MAC address. If your laptop is configured to use DHCP so that it can be used on different networks, you can still tell your router to reserve one particular address from it’s DHCP range for it so that it always appears in the same place. A similar approach can be used to ensure that devices such as printers always appear at the same address when allocated their address via DHCP.
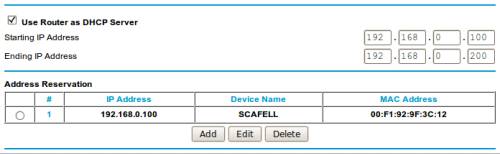
The DHCP configuration from a Netgear broadband ADSL router, showing that it is able to lease addresses from 192.168.0.100 to 192.168.0.200. In addition, one IP address in that range (192.168.0.100) has been reserved for a device with the MAC address 00:f1:92:9f:3c:12.
What’s that in the ointment?
If your router doesn’t have the ability to reserve IP addresses in this way, all is not lost. DHCP can still be a useful way to override the default addresses set in things like printers and network-attached storage units so that they can be seen on the local network. Once this has happened, they can be accessed using the temporary address long enough to be re-configured to use a fixed IP address.
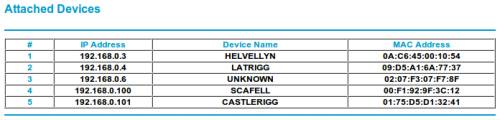
The Attached Devices list from the same Netgear ADSL router, showing how to find the IP addresses which have been allocated by the DHCP. Note that ‘Scafell’ turns up with the correct address of 192.168.0.100 – as reserved in the previous screenshot. The 192.168.0.101 address has also been allocated by DHCP, while the others have been statically set on each bit of hardware.
Those using Windows ICS have another problem to deal with. While it offers DHCP, ICS does not appear to have a means of limiting the range of addresses that it offers to lease. As such, it starts with 192.168.0.2 (remember that ICS always gives itself 192.168.0.1), and will happily work through to 192.168.0.254 if you connect enough things to the network.
If two devices on the network get the same address, one of them will disconnect until the clash is resolved. As such, users of ICS (in particular – clashing IP addresses is a problem that can affect any network if mistakes are made) need to watch out of this. In practice, given that most home networks will be used with few devices, it’s possible to work around the limitation by using high numbers for fixed IP addresses and keeping an eye out for problems.
Configuring RISC OS
On native RISC OS systems, the IP address is set from within the Network configuration section of Configure (double-click on !Boot, or select “Configure...” from the Task Manager’s iconbar menu). Since each network interface can have its own address, the options are set from the Interfaces section.
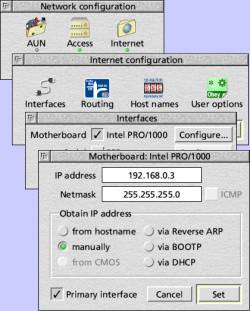
Inside Network Configuration, select “Interfaces”, then click on “Configure...” beside the entry for the network interface which is to have its address set.
To configure the address manually, select “manually” and enter the IP address and netmask into the fields. To set the addresses automatically using DHCP, select “via DHCP”.
Note that this screenshot is from RISC OS 5, but the options are very similar in RISC OS 4 and Six.
On Virtual Acorn systems, the network settings are picked up from the host and should not be changed in RISC OS – see Configuring Windows below.
Configuring Windows
As with RISC OS, Windows configures IP addresses individually for each network interface. However, it can be quite difficult to get to the configuration options.
Go to the Control Panel (from the Start Menu). On Vista, select “Network and Internet”, then “Network and Sharing Center” and finally pick “Manage Network Connections” under “Tasks” in the left margin. On XP, go to “Network and Internet Connections” in Control Panel, then select “Network Connections” from the left margin. If you use ‘Classic View’ for the Control Panel on either system, then simply select “Network Connections” to get to the same place more directly. On Windows 7, select “View network Status and tasks”, then “Change adapter settings” from the margin.
The Network Connections window contains an entry for each network interface on the computer: double-click on the one corresponding to your network card. This opens a Connection Status dialogue, at the bottom of which is a Properties button – click on this, and the Connection Properties dialogue will open on top.
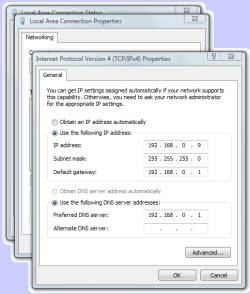
In the centre of this new dialogue will be a list of items ‘used’ by the connection. Select the entry for “Internet Protocol Version 4” (or just “Internet Protocol” on Windows XP), then click on the Properties button beneath the list to open the Internet Protocol Properties dialogue (pictured).
To use DHCP on the connection, simply select “Obtain an IP address automatically”. Alternatively, selecting “Use the following IP address” will allow a static address and subnet mask to be entered in the appropriate fields.
Note that this screenshot was taken on Windows Vista – similar dialogues exist on Windows XP and Windows 7, although there is no reference to IPv4 or IPv6 in XP.