

Meeting: 3D Printing and Computer Aided Manufacture
Mike Cook used his annual visit to tell us about the 2010 Maker Faire in Newcastle, before moving on to look at the billed subject. Starting with an overview of what 3D manufacture was, he showed us some videos of the “RepRap” and “MakerBot” which can both make objects in plastic – and the “CandyFab”, which can do the same in caramelised sugar. To close the evening, he looked closer to home at his own project to build a 3D CNC-controlled milling machine.
Report by Chris Bass and Steve Fryatt, pictures by Colin Sutton
Our July meeting saw Mike Cook return for the 2010 instalment of what is becoming something of an annual event. The billed subject was to be “3D Manufacture”, but Mike said that he intended to look at a number other things that he had been up to since his last visit – including the 2010 Maker Faire in Newcastle.
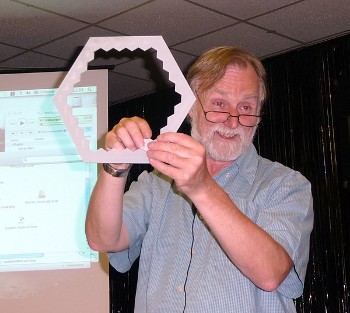
Mike shows the ‘hexome’ keys, which he cut from perspex at the Manchester FabLab
Wireless interfacing
When he visited us last year, Mike had brought with him a couple of wireless devices which he had intended to show interacting with his iBook. Sadly the technology had other ideas on the night, and he had gone away without being able to show us what it could do.
This time – despite a few last-minute wobbles – the hardware behaved itself. The first item was a Wii Remote with the optional ‘Nunchuk’ interface attached: two small hand-held devices attached by a short wire. Connecting to the laptop through bluetooth, they each contained motion sensors and accelerometers.
With the devices talking to the computer, Mike started up an application that turned the two controls into a drum kit: moving either like drumsticks created the appropriate sounds via the iBook’s audio. The second program turned the Wiimote into a Lightsaber, allowing Star Wars fans to practice without any of the problems associated with the real thing.
The second delayed hardware demo involved using the WiFi capability of an iPod touch to pass data back and forth to the iBook. Mike had a number of small interactive demos set up, so that gestures on the iPod’s screen were reflected in actions on the computer; the finale was a set of 3D ribbons which moved on the projector screen in sympathy with finger movements on the iPod.
Maker faire
With the wireless interfacing out of the way, Mike moved on to talk about the 2010 Maker Faire in Newcastle. The first event had been held in March 2009, and was a chance for people to show things that they had made – electronic or otherwise. Mike had attended it with a number of his Arduino-based projects – you can read about this in the report of our April 2009 meeting in The WROCC 27.2.
The 2010 event had built on the previous year – and it was indoors, not in a big tent outside. This time Mike took a number of newly Arduino-rejuvinated projects along to show visitors; most of which would have been familiar to anyone who had visited the old Acorn shows that he had attended.
His MIDI Chaotic Pendulum consisted of a magnet swinging over a table with a number of reed switches on: as the magnet moved, it closed switches and created notes via MIDI. The energy used to close the contacts was enough to vary the pendulum’s swing slightly and so the pattern of the swing changed over time, altering the order of the notes generated.
MIDI Footsteps also created music, this time by sensing the movements of people walking and running around a circular path of pressure sensors. Staying with the sensory theme, Mike’s RFID version of the Crazy People game used a set of swipe cards to create pictures of people on a computer screen – similar to those three-part flip books that many of us probably remember from childhood.
The faire had plenty of other exhibitors, ranging from the fairly sensible to the completely bizarre. Some of the highlights picked up on by Mike were a touch-sensitive ‘human aquarium’ and a collection of drunk robots. Mike made a short video of the event, which is on his YouTube channel.
3D fabrication
Having shown us what he had taken to Newcastle, Mike commented that he was finding that he was spending more time and effort on boxing his projects up nicely these days: not only was this aesthetically pleasing, but it also made them more robust and easier to reuse in the future. An example was the box containing the RFID sensors for the Crazy People game, which we had just seen in a video.
While much can be achieved using conventional tools and a workbench, technologies such as CNC have the potential to create a lot of new possibilities. Tools to create 3D objects from computer files have been available to those with the money – that is, industry – for years, but costs are now coming down to the extent that home users can also begin to get in on the act.
Mike had found himself researching the options, and he discovered that there were two ways to go about creating a 3D shape: milling chunks off a pre-existing block, or starting from nothing and building up the required sections. When building objects up there are two different approaches again: deposition using molten plastic or sintering, where layers are built up with powder which is locally fused step by step to make the required shape.
Open source 3D
There are a number of systems becoming available to a home user, with varying approaches and levels of quality. The first one that Mike looked at was the RepRap: originating from a team led by Adrian Bowyer at Bath University and now with a global community, it is an open-source project (GPL 2 – just like software). Potential owners can either buy a kit of bits, or make their own from the drawings. Better still, the RepRap can even print many of its own component parts: if you know someone with one, they can print you the best part of another!
An alternative is the MakerBot: supported by the people behind the Maker Faires, it too is an open source design which can be made from scratch or bought in kit form; another alternative is the Fab@Home. All three are deposition systems, which build up objects using molten plastic or similar materials.
In contrast, Mike’s research had only turned up one example of a sintering system. The CandyFab, produced by The Evil Mad Scientists, uses sugar as a raw material and a hot-air pencil (intended for use as a solder rework station by its manufacturers) to fuse it into a lump of caramel. A powerpoint presentation from their website showed the development process and much of the experimentation that was still taking place with the design.
DIY in Manchester
If you don’t fancy buying your own 3D printing system, then help is still at hand: Mike told us that he had recently visited the new Fab Lab in Manchester. One of 35 similar initiatives around the world and based on a concept from MIT, the Manchester site is supported by The Manufacturing Institute and provides facilities including 3D printing, laser cutting, milling and routing, embroidery and vinyl cutting. Normally costing up to £400 per day, the whole place is open to the public for free on Fridays and Saturdays: turn up with data, and leave with a finished product.
Not wanting to put such a useful resource to waste, Mike had taken his designs for a ‘hexome’ (a hexagonal monome – again, see the April 2009 meeting report) and used the laser cutter and router to produce perspex panels for the facia and switches, and circuit board to take the electronics below. We will have to wait for his next visit to see how this design comes on.
3D milling
To close, Mike showed us another project he has on the go: converting a small bench drill into a CNC-controlled 3D milling machine. Rather like a simple X-Y plotter with a third Z axis and the ability to cut away chunks of whatever is placed in it, this would provide an alternative approach to 3D printing for some tasks. Just as with 3D printing, however, care needs to be taken to ensure that the required shape can be created without the remaining material getting in the way of the milling head.
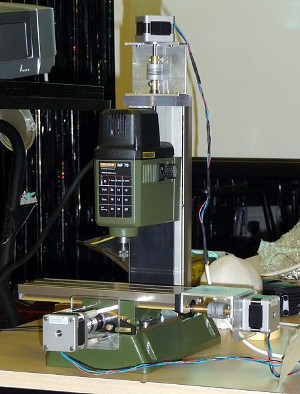
Mike’s home-made 3D milling machine, made from a pillar drill and a custom servo controller
Mike’s approach was to fit a moving bed to the drill stand, controlled by two stepper motors to give accurate positioning in the X and Y axes. The drill’s movement up and down its stand was controlled by a third motor. The motors were mounted using plates created for the task and, in a similar way to the RepRap, some of them had been created by the drill itself. The drive shafts were linked up using flexible couplings to avoid any problems with alignment.
All three motors were connected to a control box containing drive circuits and a small microcontroller; this, in turn talked to a computer. A suitable CNC file – in the industry-standard format – could be fed to software running on the computer, telling the miller what to do.
Since the project is still a work that is very much in progress, Mike had only made the Z axis control operate that weekend – although he said that it had worked first time! As such, he opted not to demonstrate it by using it to mill anything, but instead attached a pen and instructed it to draw a series of circles on a sheet of paper stuck to the moving bed. The meeting ended well after 10 o’clock, with many of the audience standing around the front table watching the machine in action.
Find out more
Mike’s website at www.thebox.myzen.co.uk contains details of his projects, including videos of their construction and use. His YouTube channel at www.youtube.com/user/Mike73Cook has a video of the 2010 Maker Faire.
Details of the various 3D deposition fabrication systems are at www.reprap.org, www.makerbot.com and www.fabathome.org. CandyFab has its own site at www.candyfab.org; The Evil Mad Scientist’s website, which contains many more projects and ideas, is at www.evilmadscientist.com.
The Manchester FabLab is online at www.fablabmanchester.org.